Homemade Chicken Pot Pie
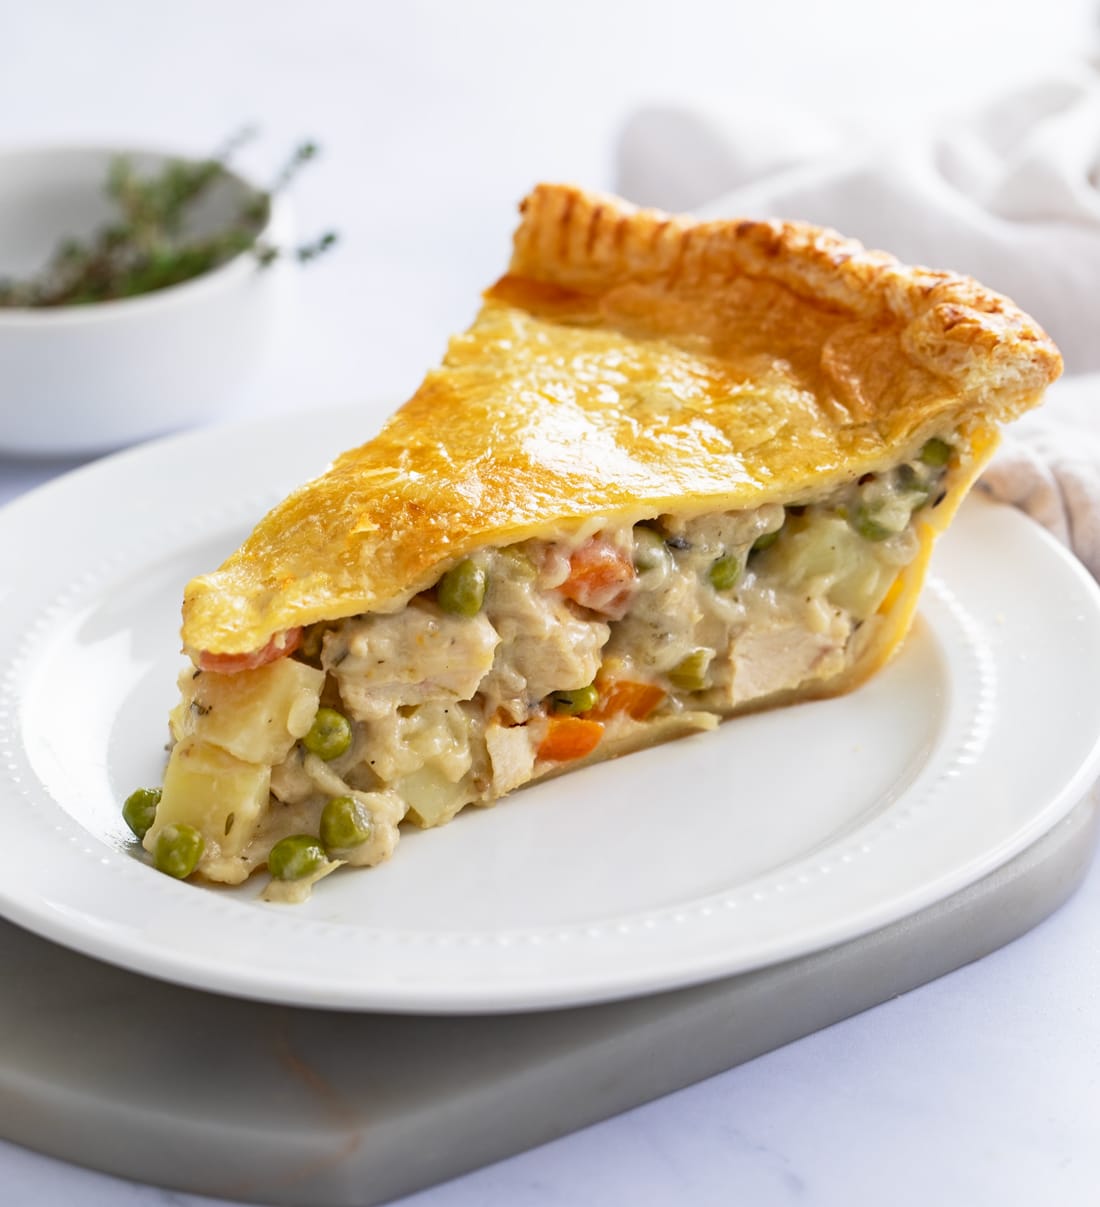
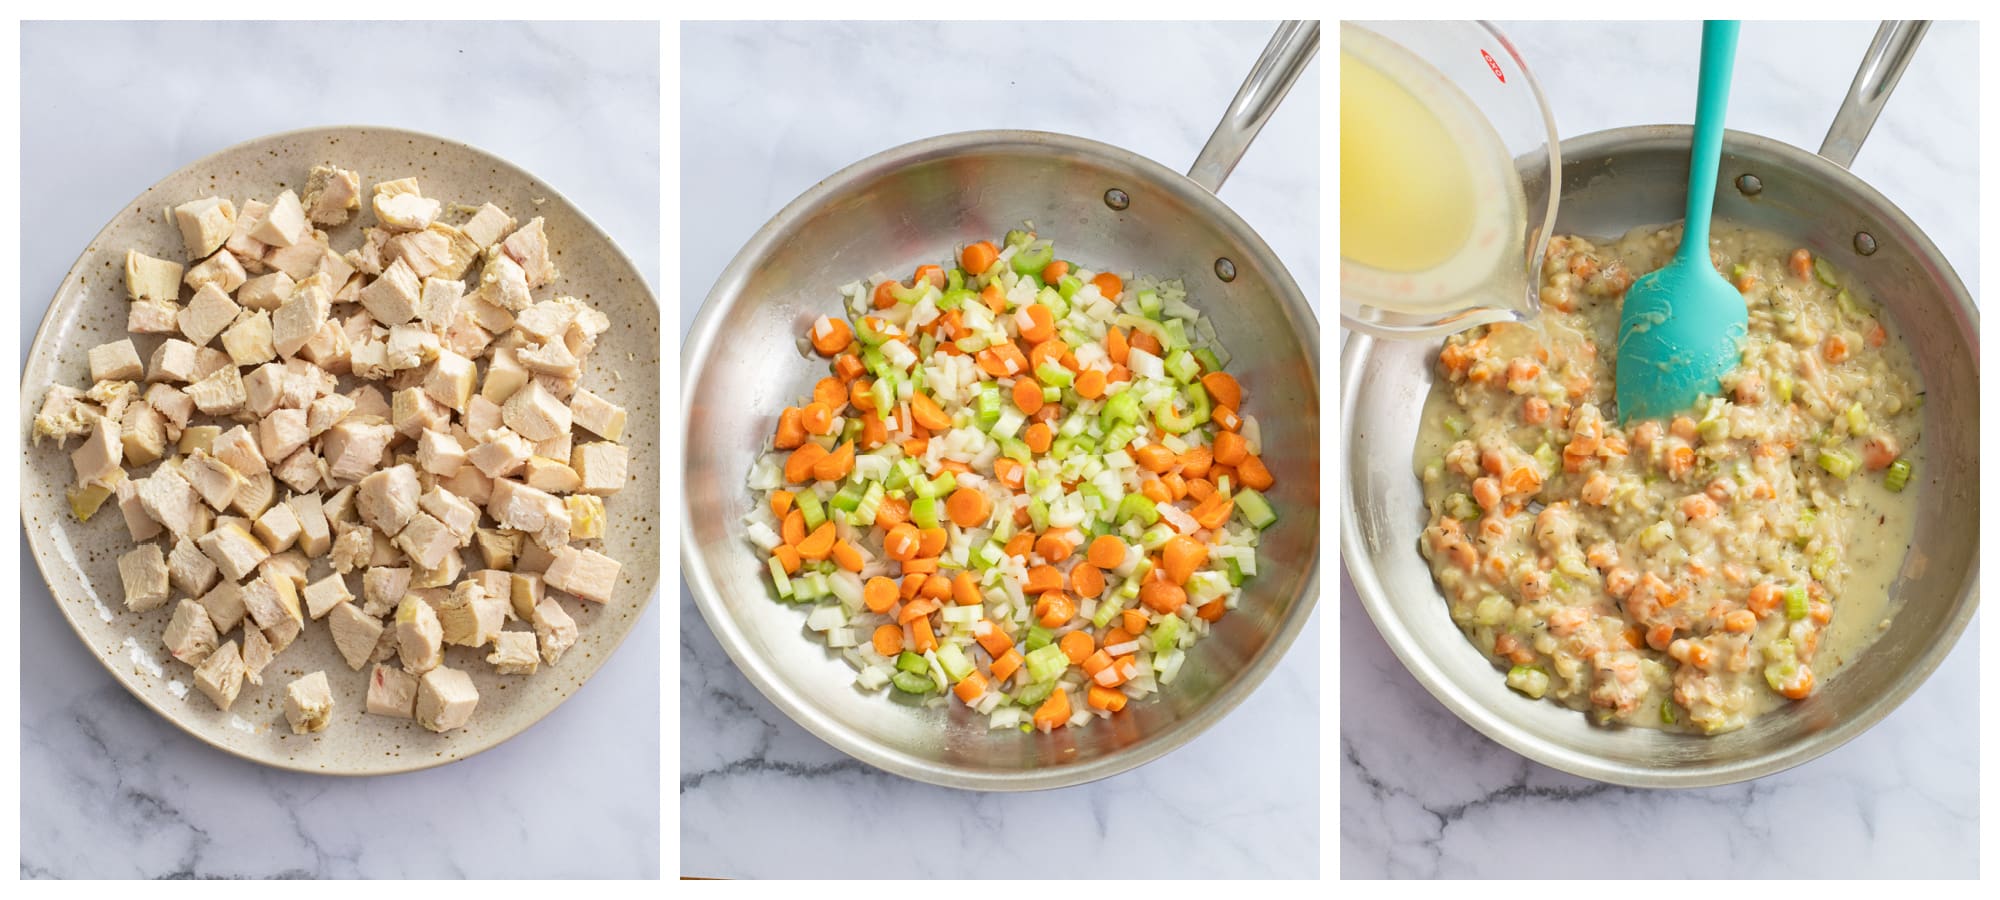
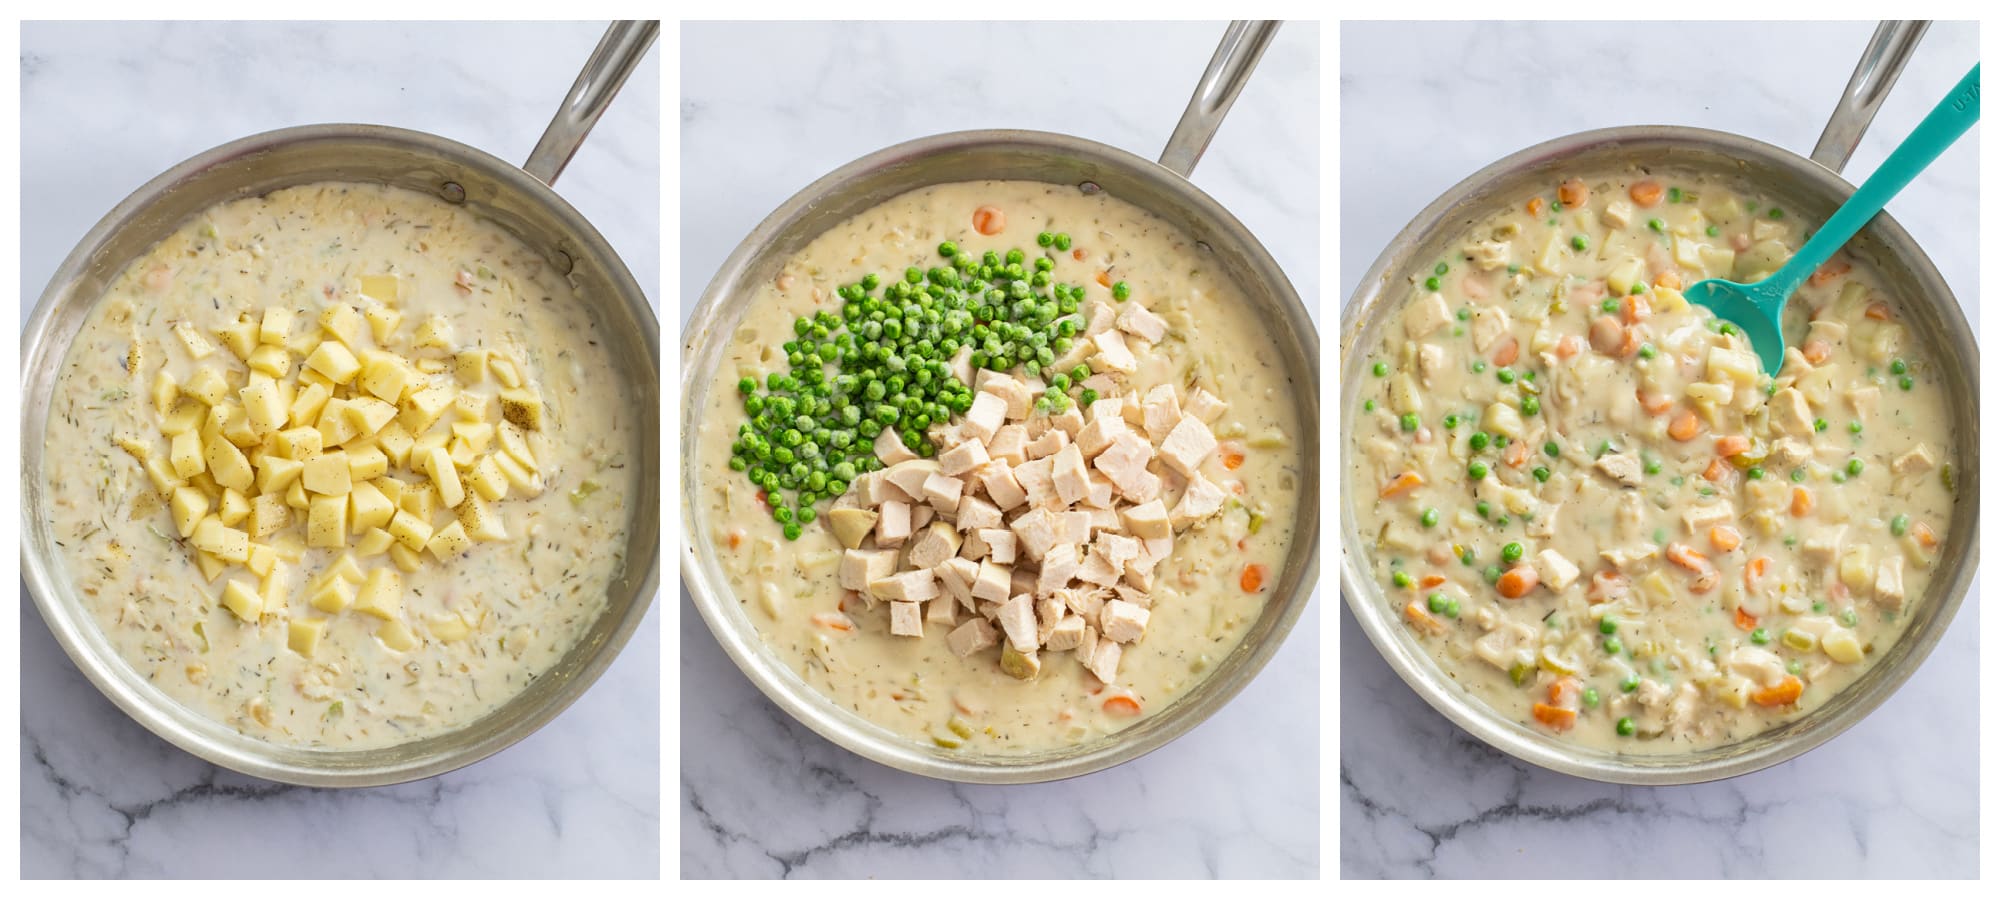
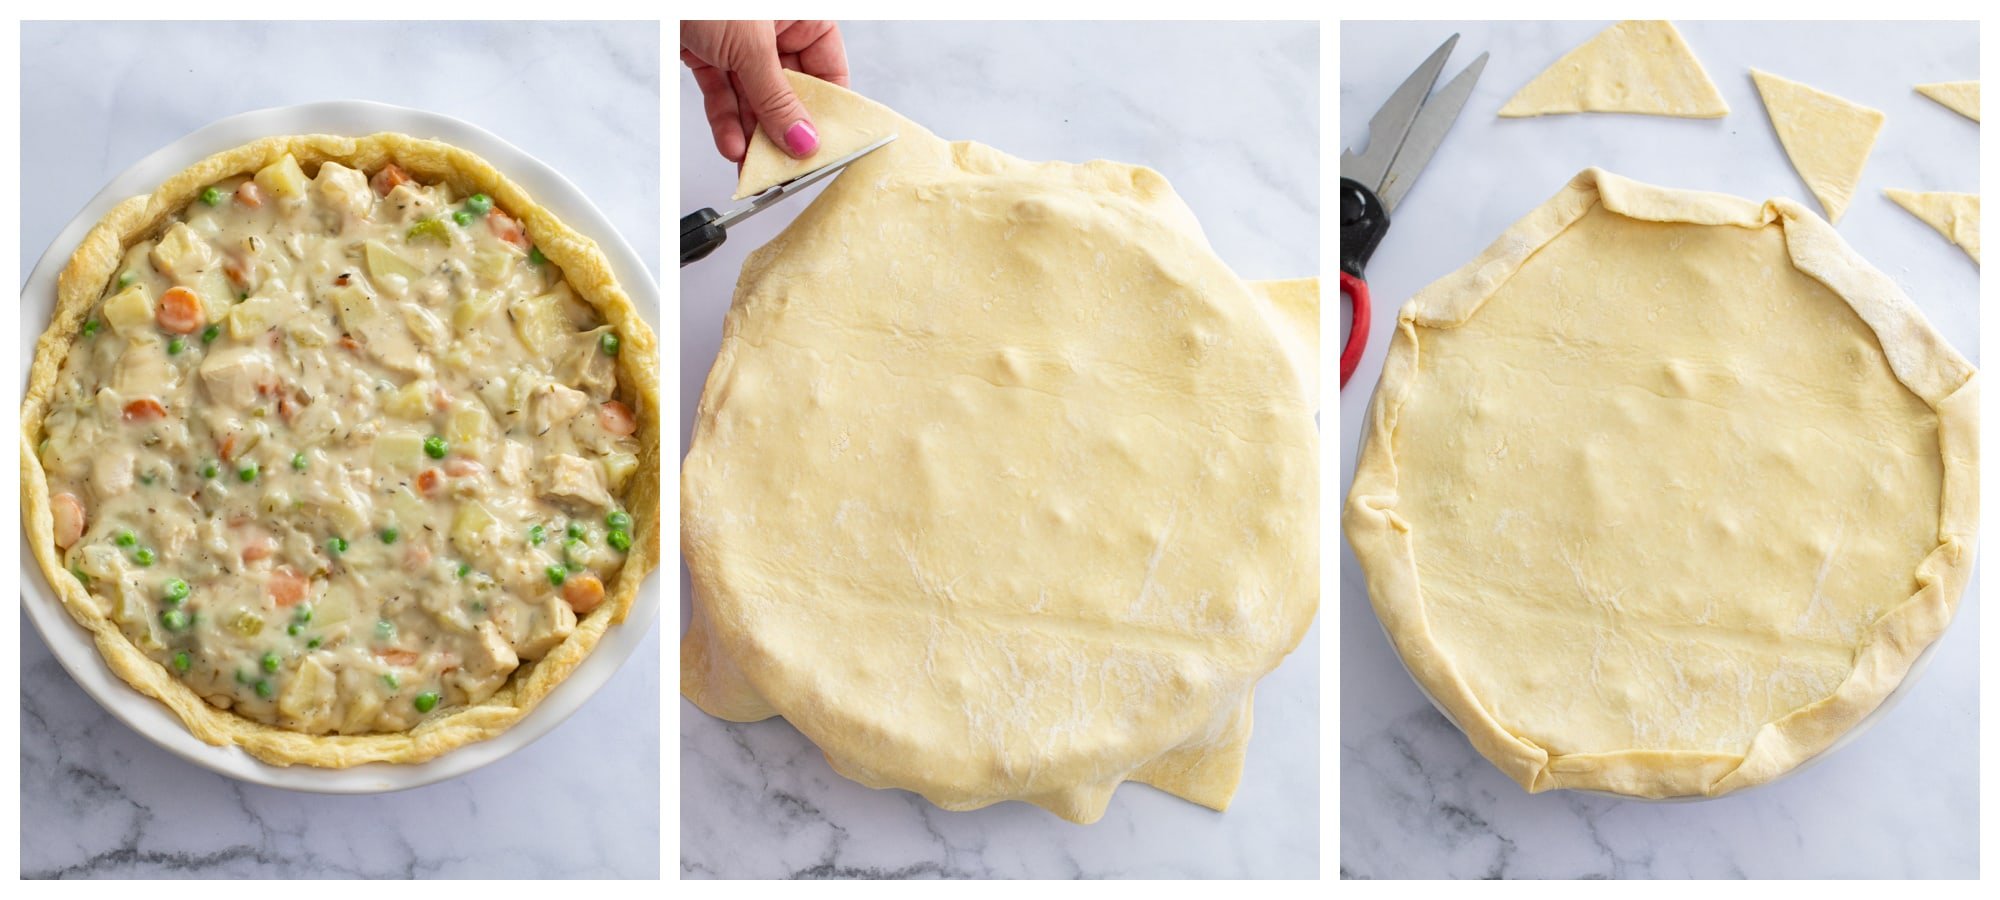
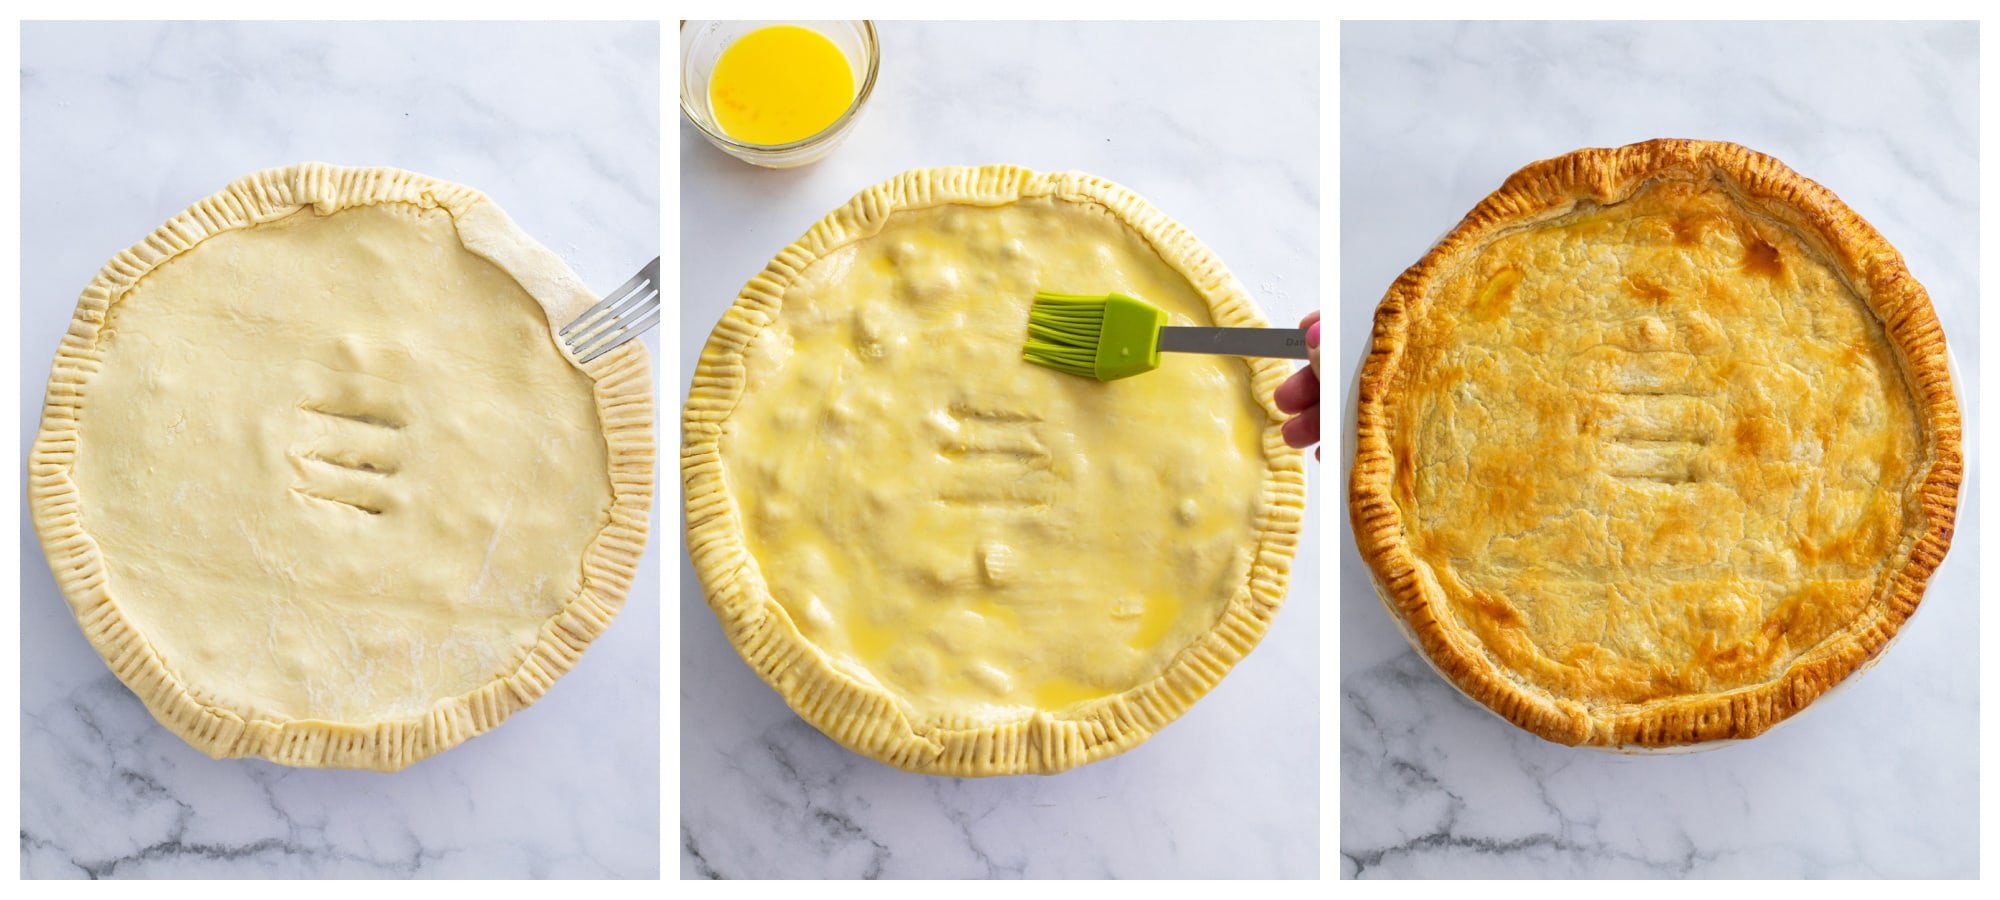
There’s a unique kind of magic that fills the kitchen when I bake this Chicken Pot Pie. The rich aroma of buttery crust and savory filling wafts through the house, drawing everyone toward the kitchen. This recipe holds a special place in our family—it’s my husband’s absolute favorite. Remo jokes that he can smell it from a mile away, and honestly, I think he’s right! This recipe is all about bringing joy to the table without the stress—something we could all use a bit more of. Preheat your oven to 425°F (220°C). Position a rack in the lower third of the oven to prevent the bottom crust from becoming soggy. In a large skillet, melt ⅓ cup unsalted butter over medium heat. Add the diced chicken and cook for 5-7 minutes, until it’s no longer pink. Stir in the chopped onion, diced carrots, diced celery, and minced garlic. Cook for another 5-7 minutes until vegetables are tender. Sprinkle ⅓ cup all-purpose flour over the chicken and vegetables. Stir constantly for 1-2 minutes to cook off the raw flour taste. Gradually pour in 1½ cups chicken broth and 1 cup milk, whisking continuously to avoid lumps.Bring to a simmer and cook until the sauce thickens, about 5 minutes. Stir in 1 teaspoon dried thyme, 1 teaspoon dried rosemary, salt, and pepper to taste. If you’d like a bit more flavor, feel free to add a chicken bouillon cube. Add 1 cup frozen peas and mix well. Remove from heat and let the filling cool for about 10 minutes. Roll out one pie crust and fit it into a 9-inch pie dish. Press it gently into the bottom and up the sides, leaving any excess hanging over the edges. Spoon the cooled filling into the crust, spreading it evenly. Roll out the second pie crust and place it over the filling. Trim excess dough, leaving about a 1-inch overhang. Fold the top crust under the bottom crust edge and crimp to seal. Cut several small slits in the top crust to allow steam to escape. Brush the top with beaten egg for a glossy finish. Place the pie dish on a baking sheet to catch any spills. Bake in the preheated oven for 30-35 minutes until the crust is golden brown and the filling is bubbling. Remove from the oven and let it cool for at least 10 minutes before slicing. This allows the filling to set.
Recipe Variations
Herb Swap: Use fresh herbs like thyme and rosemary for a more vibrant flavor (double the amount). Vegetable Options: Add or substitute with corn, green beans, mushrooms, or potatoes. Meats: While I cooked the chicken, if you have a rotisserie chicken, use that instead and save yourself a step. Turkey would also make a nice substitute. Cheesy Twist: Stir in 1 cup of shredded cheddar cheese into the filling for extra richness. Biscuit Topping: Replace the top crust with homemade biscuits for a rustic touch.
More Delicious Recipes
Chicken and Dumplings Skillet Shepherd’s Pie Skillet Chicken Pot Pie Beef Stew Buffalo Chicken Lasagna


title: “Chicken Pot Pie” ShowToc: true date: “2024-09-22” author: “Marcia Pittman”
Chicken Pot Pie
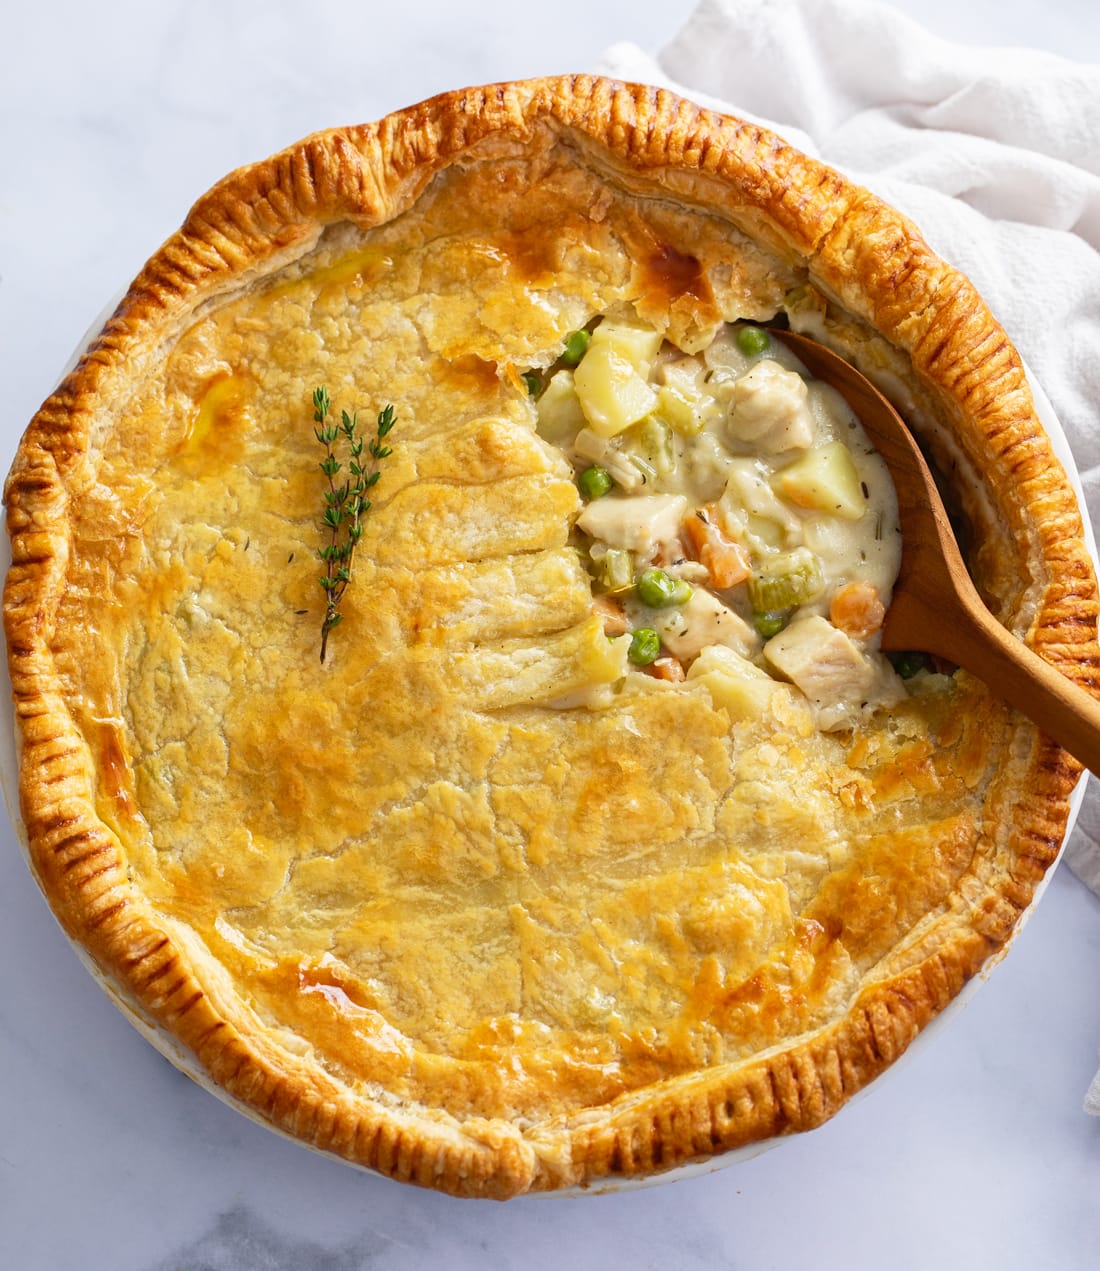
I am so excited to share this incredible Chicken Pot Pie recipe with you. Here’s why I love it: The filling is made completely from scratch (no canned soup), which gives the best hearty, restaurant-quality flavor. The filling is thick, and not dry. (Leftovers are also so delicious and creamy!) Using puff pastry adds so much butter, flakey goodness that beats traditional pie crust! The Chicken is poached in chicken broth for super flavorful, juicy results and the vegetables are perfectly tender.
How to Make It
Note: This is an overview. See recipe card below this post for ingredient quantities and full instructions. Poach the chicken by simmering it in chicken broth. Reserve the broth and set aside. Soften onions, carrots, and celery. Add garlic, seasonings, and soy sauce, followed by flour. Add some reserved chicken broth in small splashes followed by half and half.
Add diced potatoes. Bring to a boil, then simmer until the potatoes are fork tender. Add cooked chicken and peas. Spoon filling into prepared pie pan and top with crust.
Cut slits on the top of the crust, crimp the outside edge with a fork, and brush with egg wash. Bake!
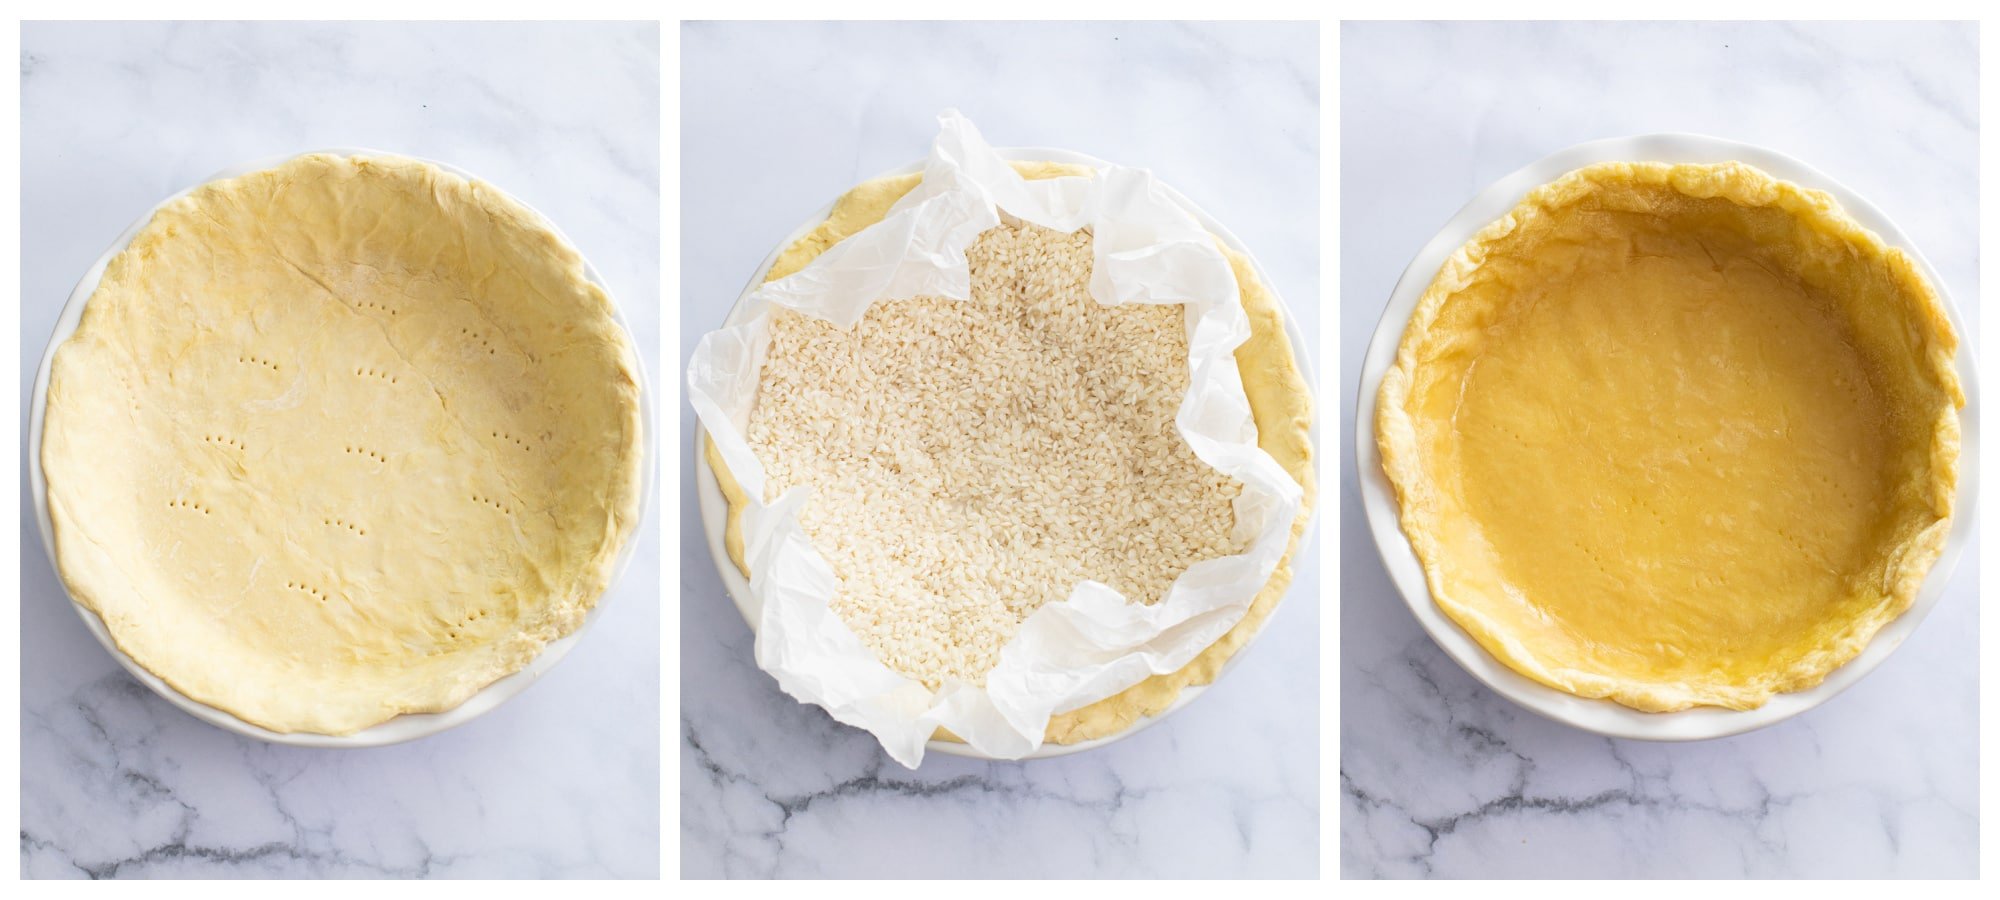
Blind Baking the Crust
To blind bake the crust, weigh it down to keep it in place, then partially bake it. This ensures that it’s crispy and not soggy. Remove the weights and bake a little more to crisp up the bottom. Weight options include rice, beans, pie weights, or even sugar. You may also choose to omit a bottom crust to save time.
Make Ahead Method
Prepare the filling as outlined. Let cool completely and refrigerate in an airtight container for up to 2 days. Heat up the filling before filling the crust, adding a splash of broth or half and half if needed. Bake as outlined.
Storage
Store in an airtight container and refrigerate for up to 3-4 days or freeze for up to 3 months. Leftovers freeze and reheat well.
Try These Next
Tried This Recipe?
Leave a review, I love hearing your feedback! ⭐⭐⭐⭐⭐
A 12-inch skillet is best for making the filling as it has sufficient surface area for the liquid to reduce and thicken. I’ve linked to the one I use in this recipe! Rolling Pin and Pastry Mat– To roll out your dough on a non-slip surface 9-inch Pie Pan and Pie Weights (You’ll want 2 sets of pie weights.) Pastry Brush– brushing the top of the crust with egg wash is key for a golden crust! Pie Crust Shield -Easy to place over your crust to prevent too much browning. Pie Server