Baked scallion bread (蔥油麵包) is one of my favorite types of bao from Chinese bakeries. Whenever I had field trips in elementary school, Mama Lin often bought scallion bread for me to eat for lunch. I loved the strong scallion flavor that came through the bao. It is probably where I developed a love for scallions. This scallion bread is inspired by those Chinese bakery scallion breads. The dough is based on my milk bread recipe, which relies on tangzhong (湯種) to give the bread a nice soft texture. Tangzhong is a Chinese technique of heating flour and water into a paste that is then added to the bread dough. This will give the bread a light, feathery texture. Admittedly, this scallion bread recipe is more complicated than my milk bread. Having tested this recipe many times, I have a lot of cooking tips for you below. Make sure to read through the post before you make the bread!
HOW TO MAKE BAKED SCALLION BREAD
MAKE THE TANGZHONG
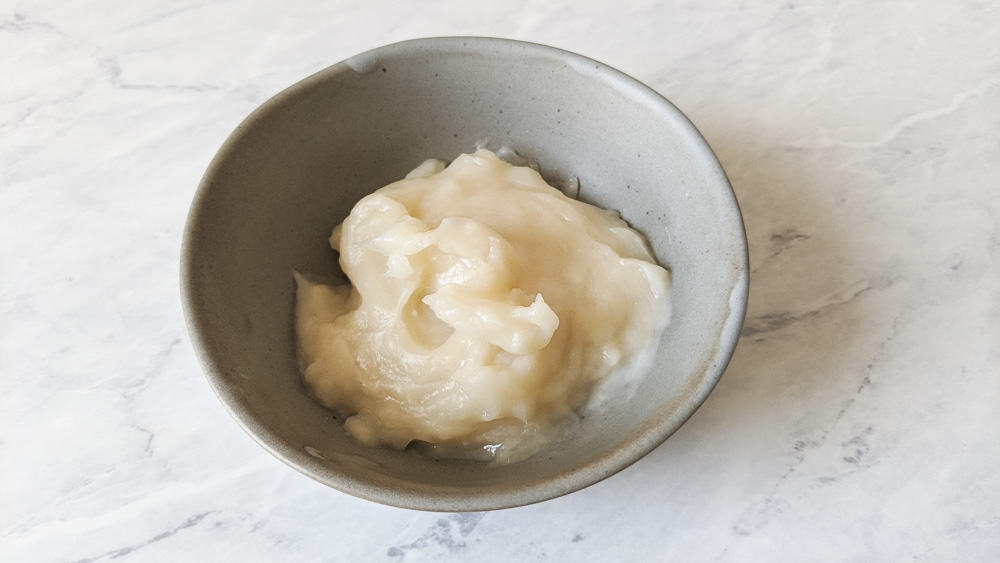
The first thing you need to make is the tangzhong. In a saucepan, whisk 20 grams (2 tablespoons + 1 teaspoon) of Bob’s Red Mill All-Purpose Flour with 75 grams (1/3 cup) of water. Heat the mixture over medium heat, stirring frequently. Once a paste starts to form, keep stirring until all the runny liquid absorbs into the paste. Transfer the tangzhong to a bowl. Let the tangzhong cool while you prepare the rest of the ingredients for the dough. For microwave directions, see the notes to the recipe.
ACTIVATE THE YEAST
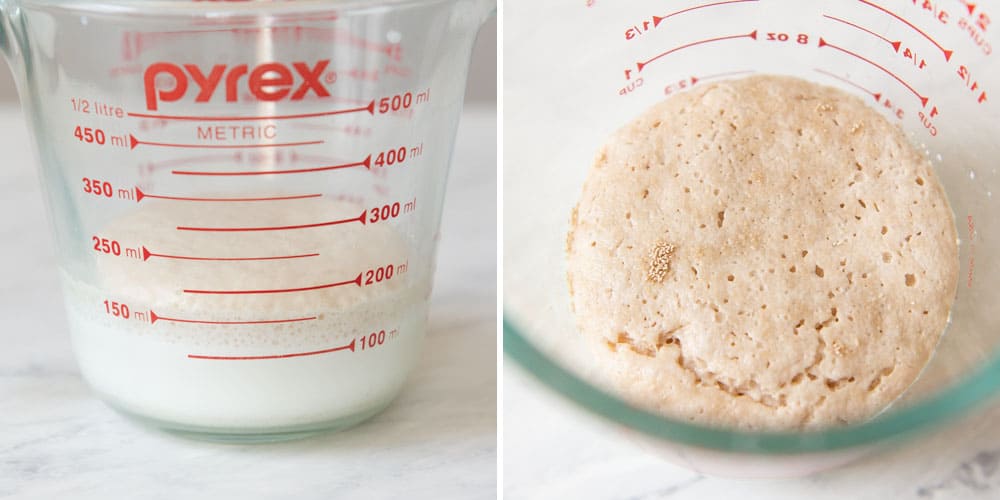
If you use active dry yeast for this recipe, you need to activate the yeast. Heat up 115g (1/2 cup) whole milk in the microwave on high for 30 to 40 seconds. Then, add 1 tablespoon of sugar into the heated milk and check the temperature. It should be somewhere around 110ºF to 120ºF. If the temperature is within the range, stir in the yeast. You don’t want the milk to be too hot because it can kill the activity in the yeast. After about 5 to 8 minutes, the yeast should foam up like you see in the photos above. If the milk still looks flat, it can mean that the yeast is out of date or the milk was too hot.
INSTANT YEAST
If you are using instant yeast, you do not need to activate it. In other words, you do not need to heat the milk and mix the yeast with the milk. Simply add the instant yeast along with the other ingredients for the dough into the bowl of your stand mixer. Then, start mixing and kneading the dough.
MAKE THE DOUGH
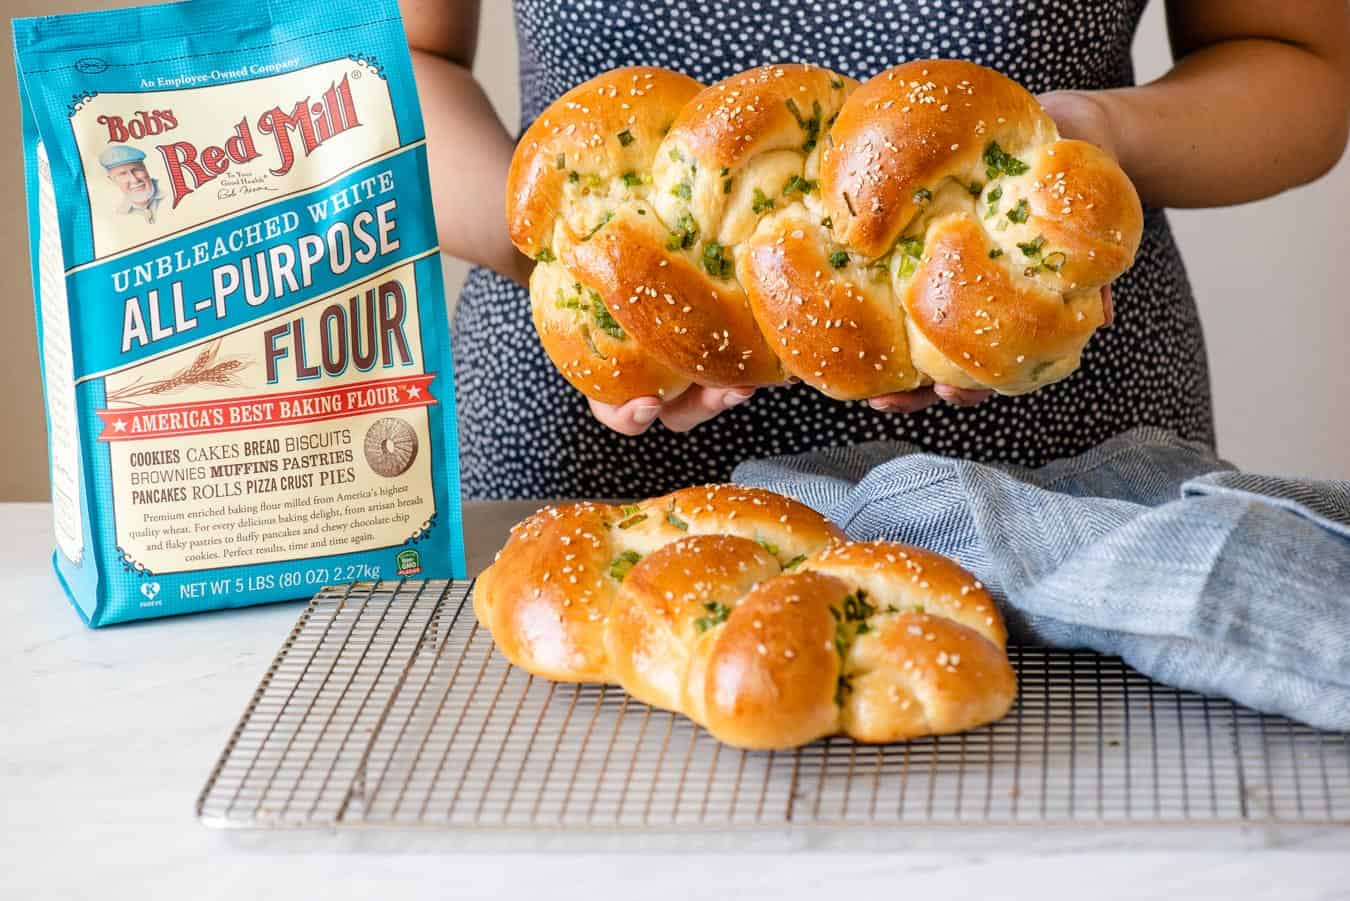
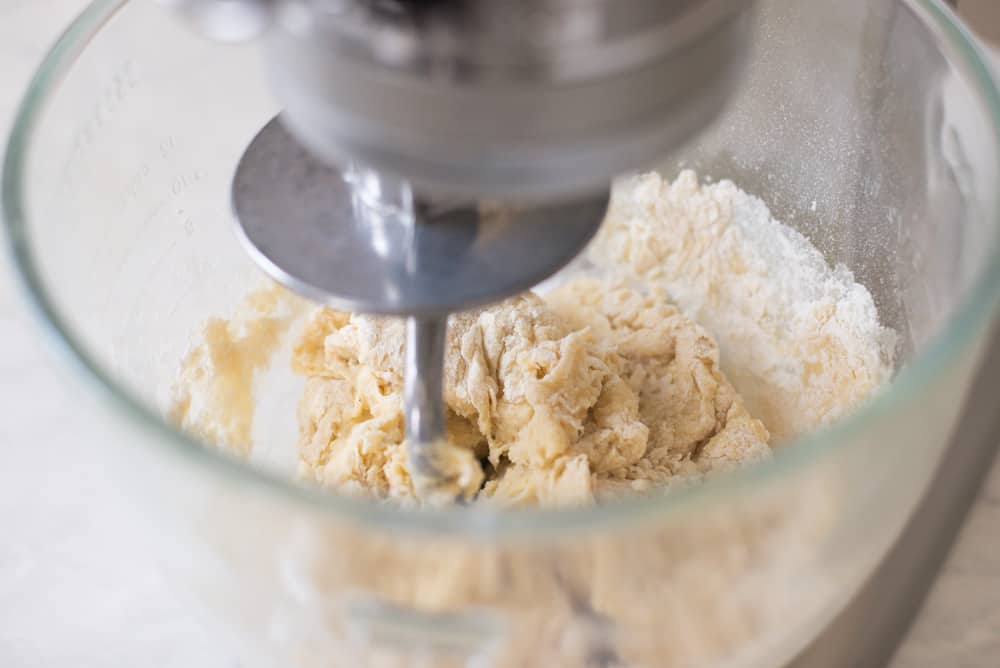
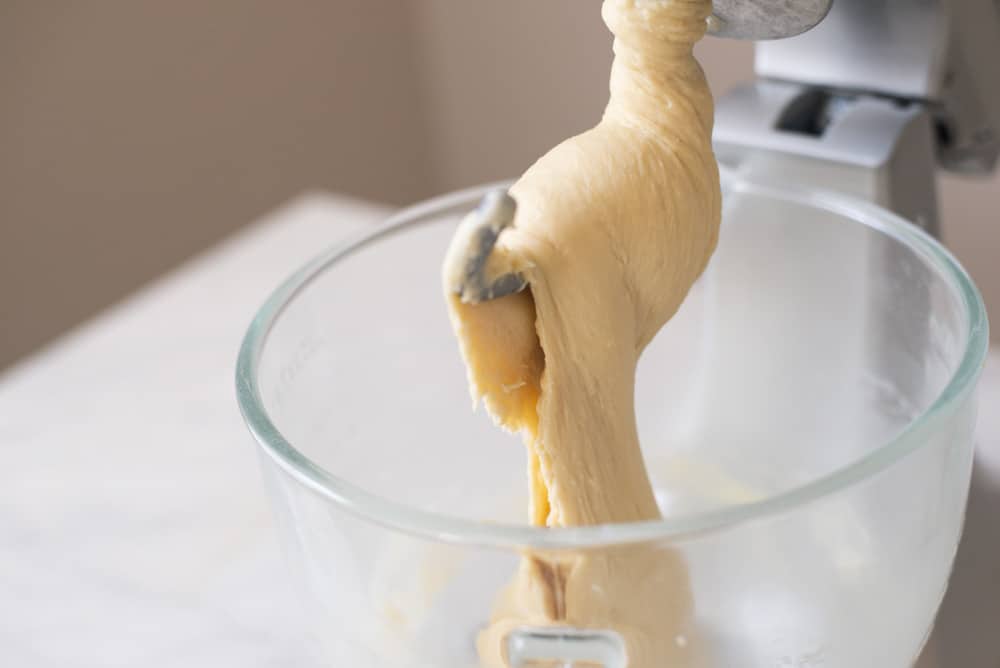
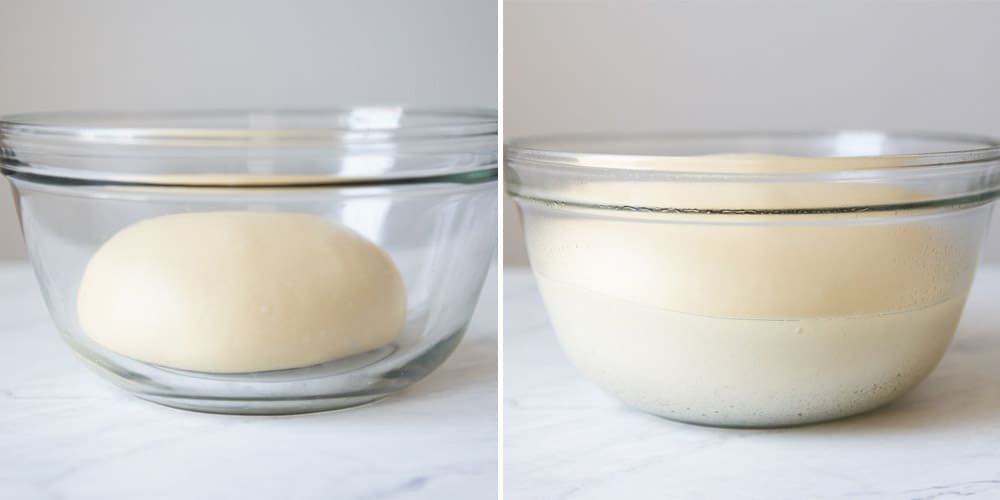
While the tangzhong is cooling and the yeast is activating, gather all the other ingredients for the dough. For this recipe, I used Bob’s Red Mill All-Purpose Flour. Bob’s Red Mill flours work wonderfully for various Asian-style breads. Not only are the flours readily available in my supermarkets, but the taste and texture of my bakes are always great. Furthermore, the all-purpose flour allows me to get the soft, fluffy texture that I expect in Asian-style breads. Because of the amount of liquids and fats in the dough, I highly recommend using a stand mixer. I usually mix the dough on low until there isn’t much loose flour on the edges of the mixing bowl (see photo above). Then, I increase the speed to medium-low and let the mixer work the dough for 8 minutes. After 8 minutes, turn the dough over a lightly floured surface and knead it a few times. The dough should be smooth and supple. Then, shape the dough into a ball and place it inside a greased bowl. Cover the bowl with plastic or a silicone lid, and let the dough rise for an hour in a warm place, until it doubles in size (see photos below).
MIX SCALLION AND OIL
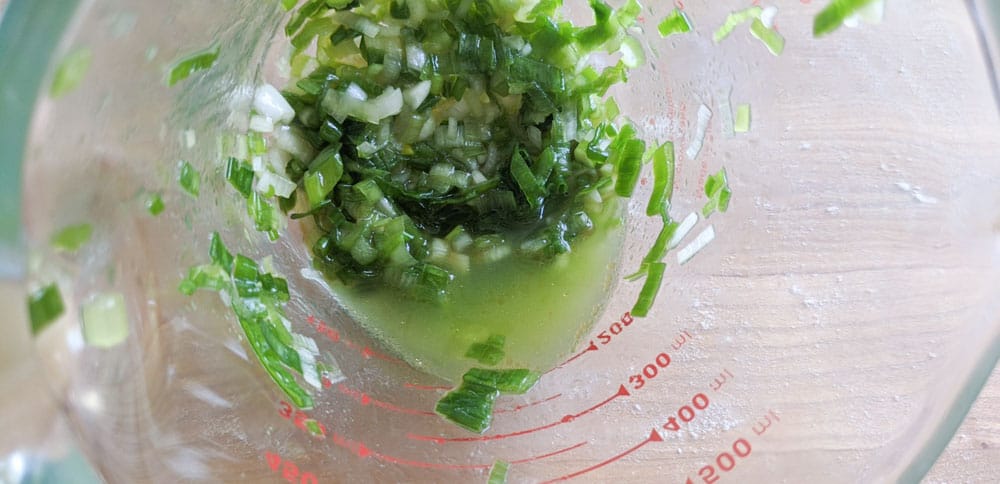
About 5 to 10 minutes before you’re ready to shape the loaves, prepare the scallions. In a bowl, stir 80 grams (1 cup) of thinly sliced scallions with 1 1/2 tablespoons sesame oil, and 1/4 teaspoon kosher salt. I like using sesame oil because it imparts a nutty aroma to the bread. However, any neutral flavored oil (such as vegetable oil) works as well. Set the bowl aside and let the scallions soften slightly.
SHAPE THE LOAVES
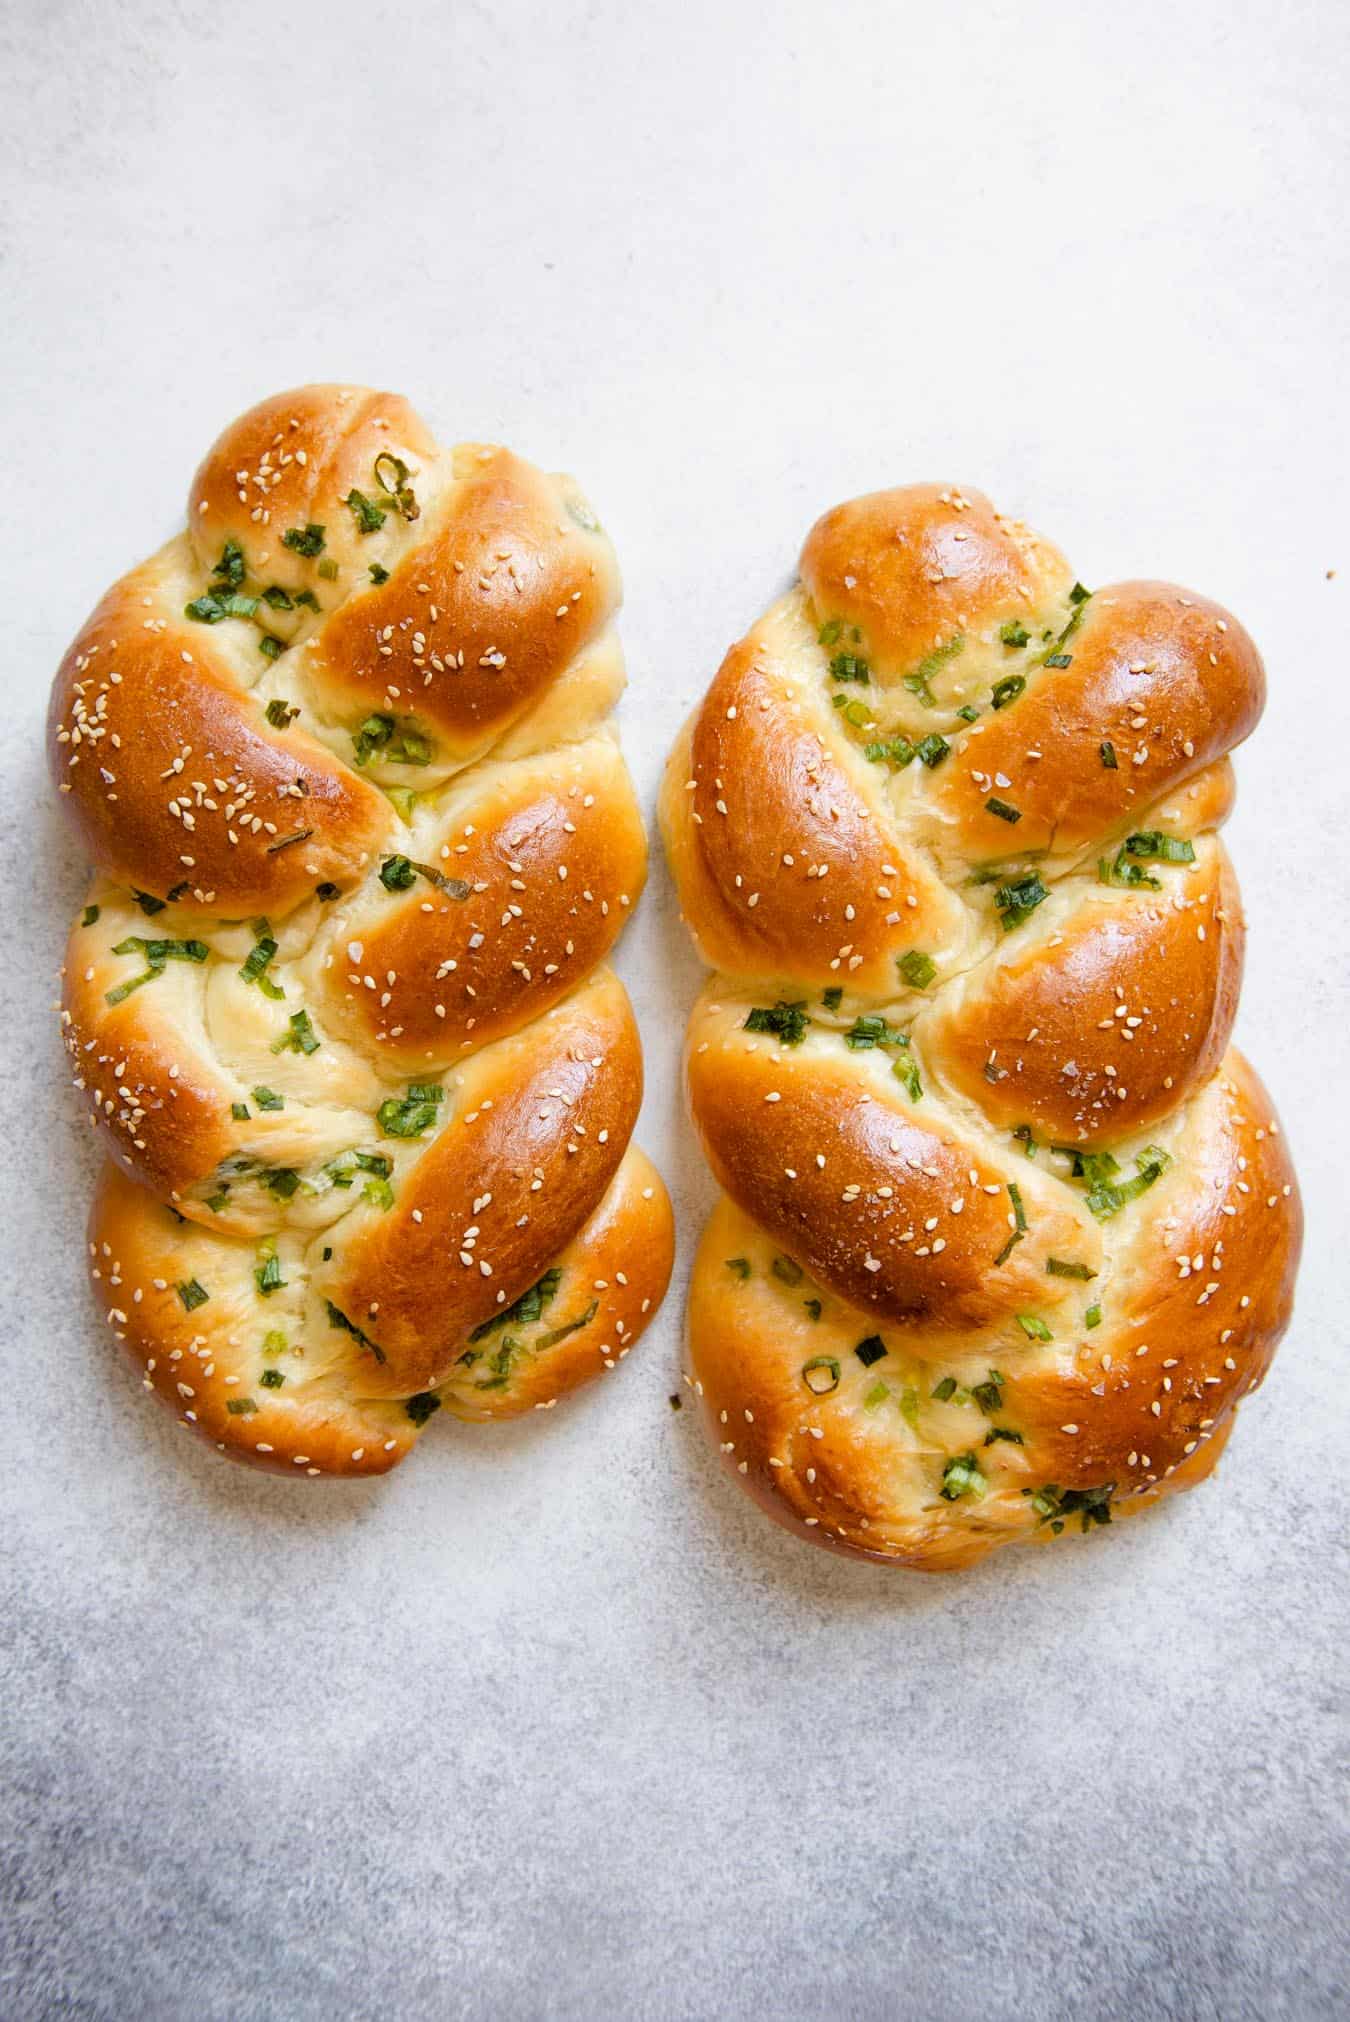
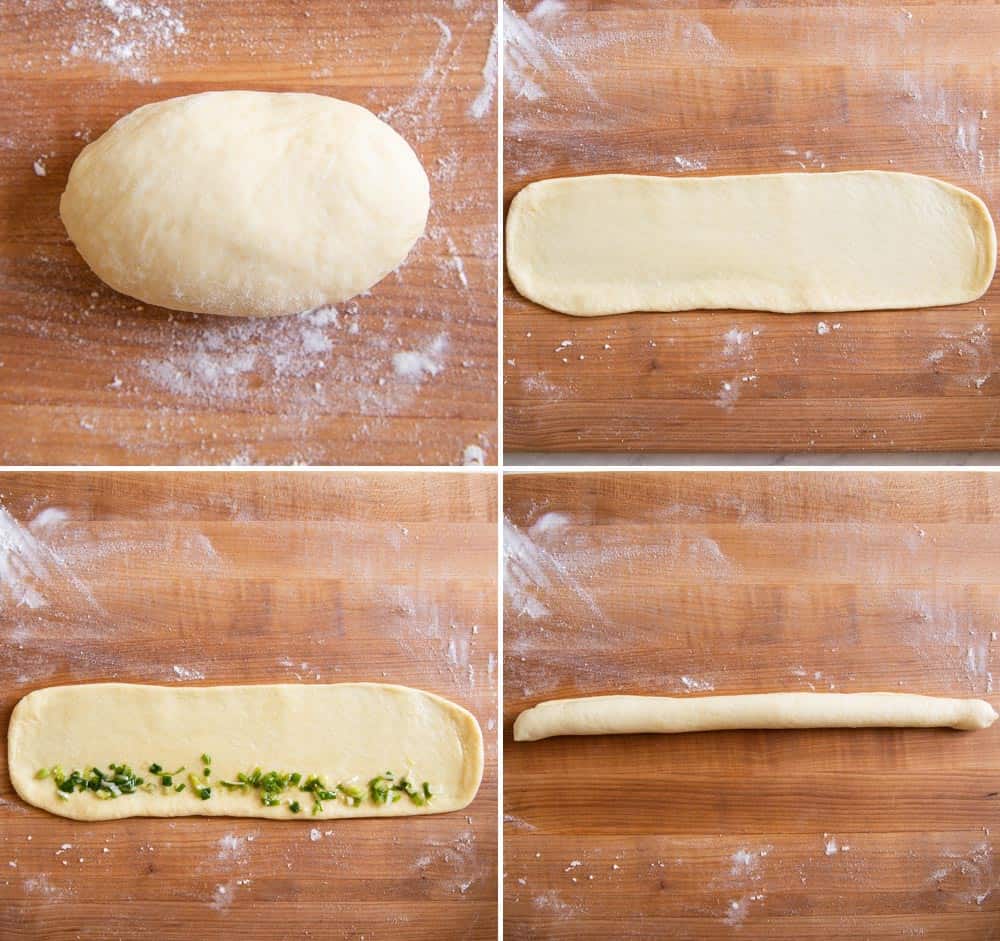
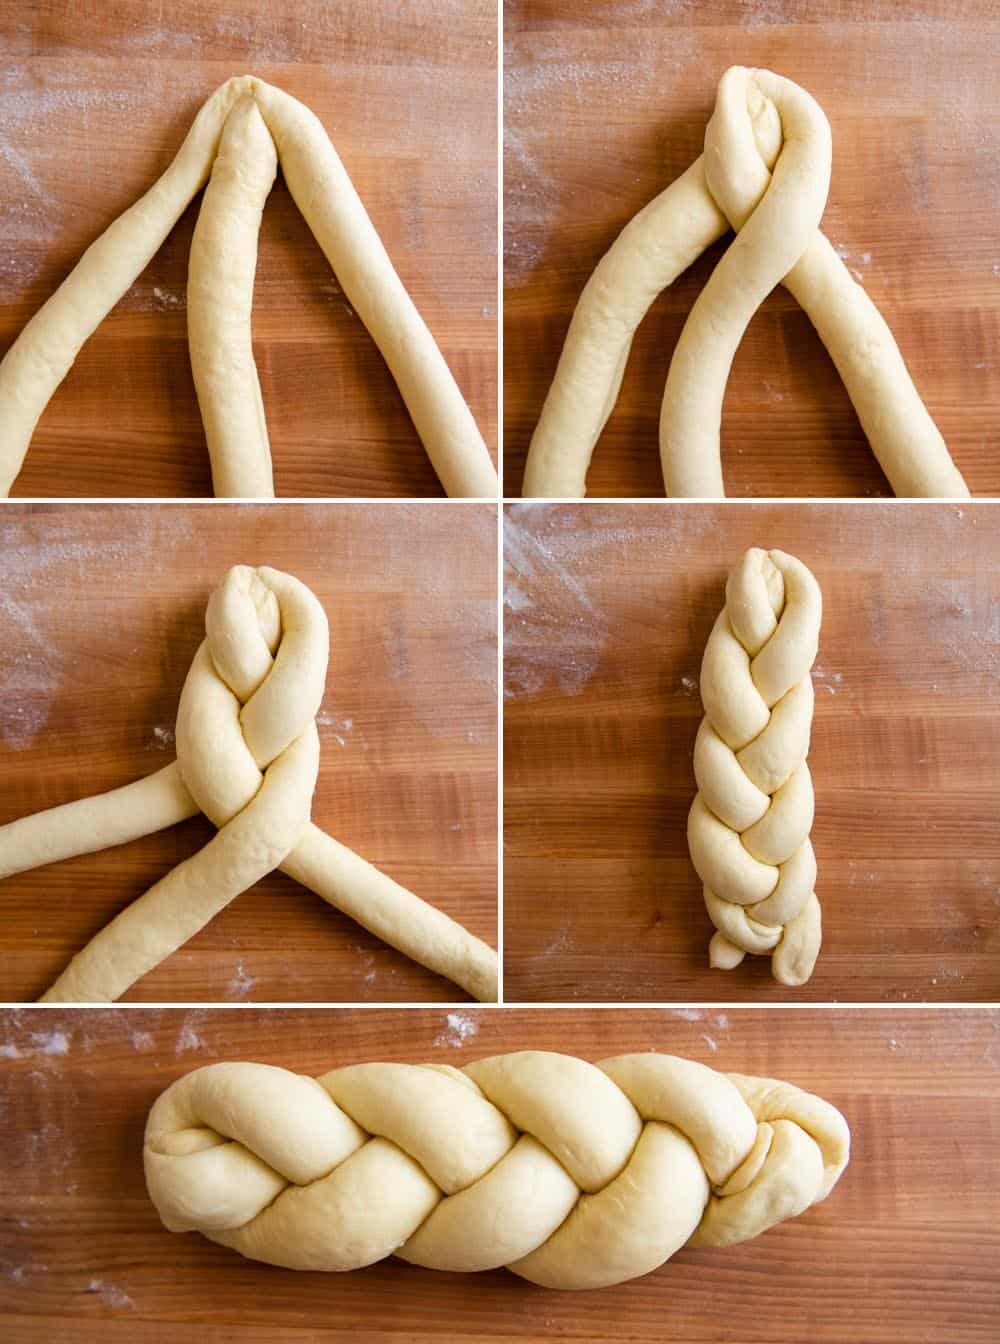
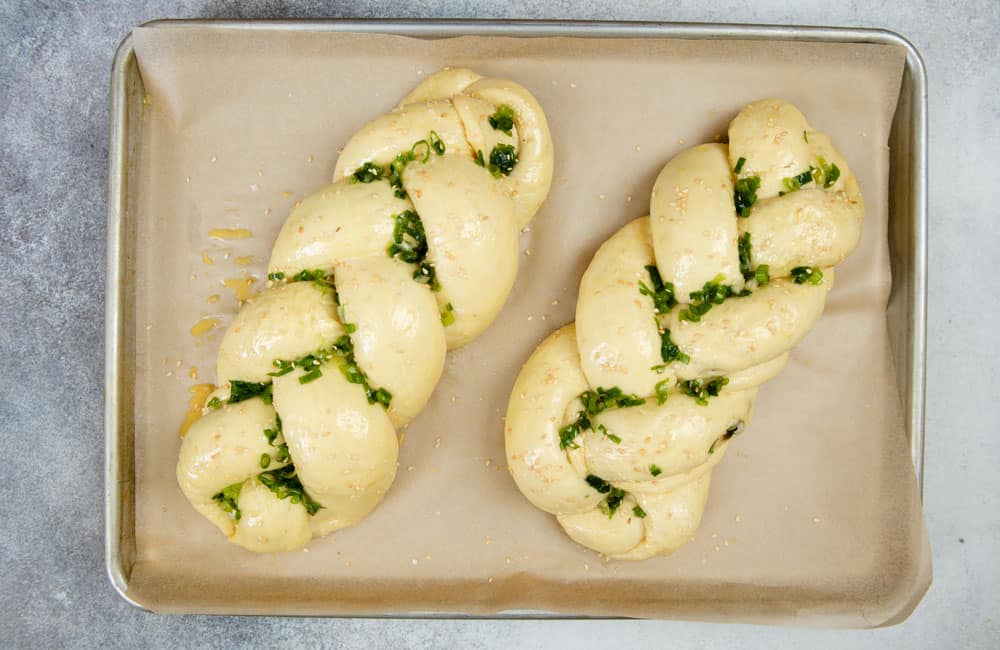
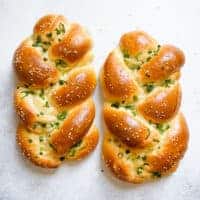
Line a large baking sheet with parchment paper (I used a half sheet). Set the baking sheet aside. After the first rise, punch down the dough to release excess air. Then, divide the dough in half (about 365 to 370 grams each). Place one half back into the bowl and cover it. Take the other half and divide the dough into 3 equal pieces, about 120 to 125 grams each. Take 1 small piece of dough and knead it a few times to get rid of any air pockets. Then, shape the dough into a small oval. Roll out the dough into a long rectangle of about 14 inches by 4 inches. Brush 3/4 teaspoon of sesame oil over the dough. Scoop up about 1 tablespoon of the scallions, and spread it alongside the bottom edge of the dough rectangle. Starting with the bottom edge, roll up the dough into a rope. Pinch the ends of the dough rope to seal the openings. Set this piece of dough aside. Roll out the 2 other small pieces of dough, top with scallions, and roll them up into dough ropes. Line up the 3 ropes of dough and pinch together the ends on one side. Braid the ropes together (use photos above for reference). Once you reach the end of the braid, pinch the ends together. Tuck both ends underneath the braided loaf. Transfer the loaf to the lined baking sheet. I laid my loaves diagonally on the sheet pan so that they have room to expand when they proof and bake. Now, shape the remaining dough into another loaf. As you shape the second loaf, you may notice that the scallions have released a lot of liquid (see photo above). I like to rinse my scallions before slicing them, which causes a lot of moisture to accumulate at the bottom of the bowl over time. Also, the kosher salt mixed with the scallions will cause the scallions to release some moisture. Try not to scoop up the watery liquid because it can cause the loaves to turn soggy during the second rise.
PROOF THE LOAVES
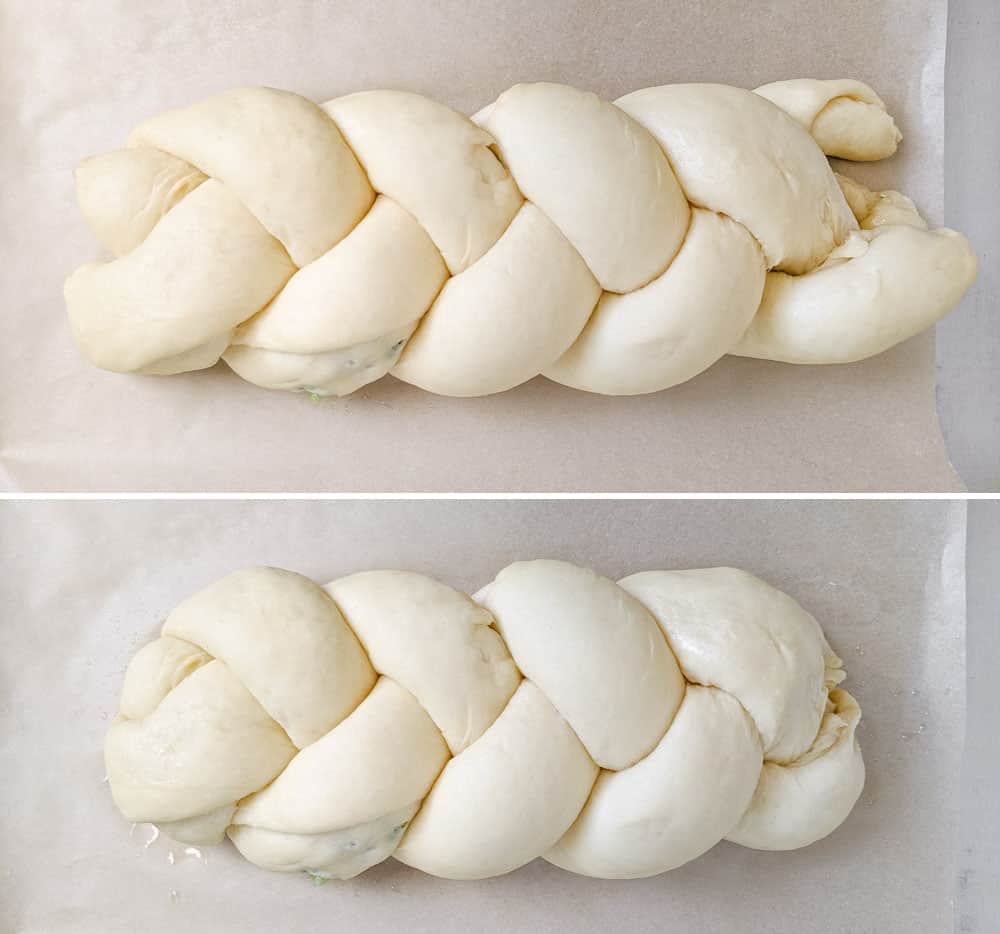
Loosely drape both loaves with plastic wrap. Let the loaves proof for 1 hour 30 minutes to 2 hours, until the loaves double in size. Note that the proofing times can vary, depending on the temperature of the room. I developed this recipe in the summer, and the proofing time was about 1 hour 30 minutes. In the winter, I expect the dough needs an additional 30 to 45 minutes of proofing time because of the colder room temperature. Technically speaking, you can bake the loaves after an hour of proofing. However, the crumb of the baked scallion bread might be tight. Also, the loaves will look like they are tearing apart at the top (see photo above). These are signs that the loaves are underproofed.
PREHEAT THE OVEN & FINISH PREPARING THE LOAVES
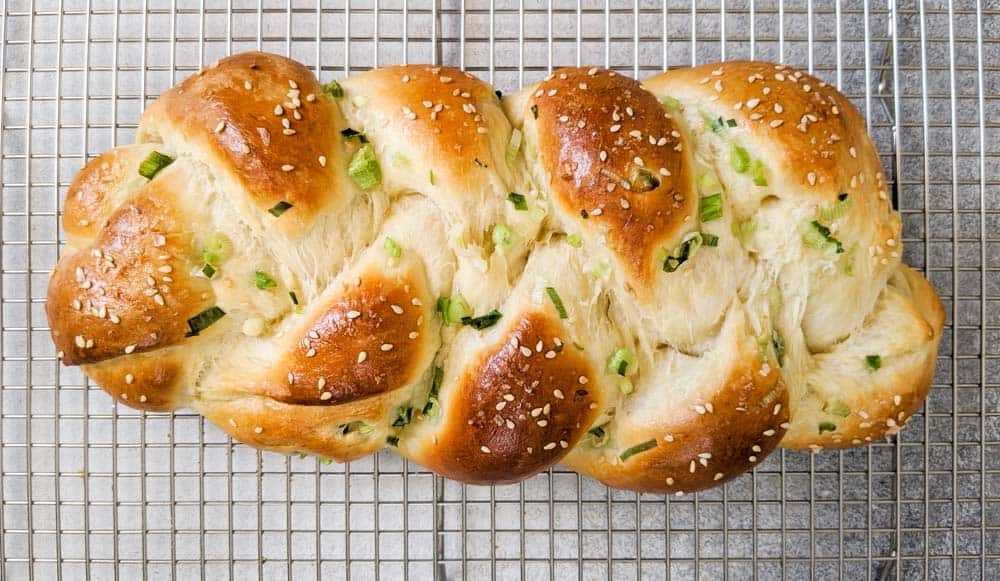
When the loaves are nearly done proofing, preheat the oven to 350ºF. Position an oven rack to the center position. Uncover the loaves. You’ll notice that the ends of the loaves have unraveled when they are proofed (see photo above). That is completely normal for this type of dough. Simply pinch the ends together and tuck the ends underneath the loaf again. They shouldn’t unravel during the baking process. Prepare the egg wash by beating an egg with 1 tablespoon of milk. The egg wash gives the scallion bread a nice golden shine on top once the loaves are baked. Using a brush, gently apply a thin layer of egg wash over both loaves. Try not to flood the creases with egg wash. For the topping, sprinkle a pinch of sesame seeds over both loaves. Spread the remaining scallions over both loaves (I like to fill the creases with the scallions). Finally, sprinkle a small pinch of flaked salt (about 1/8 teaspoon) atop both loaves, if you like.
BAKE THE BREAD
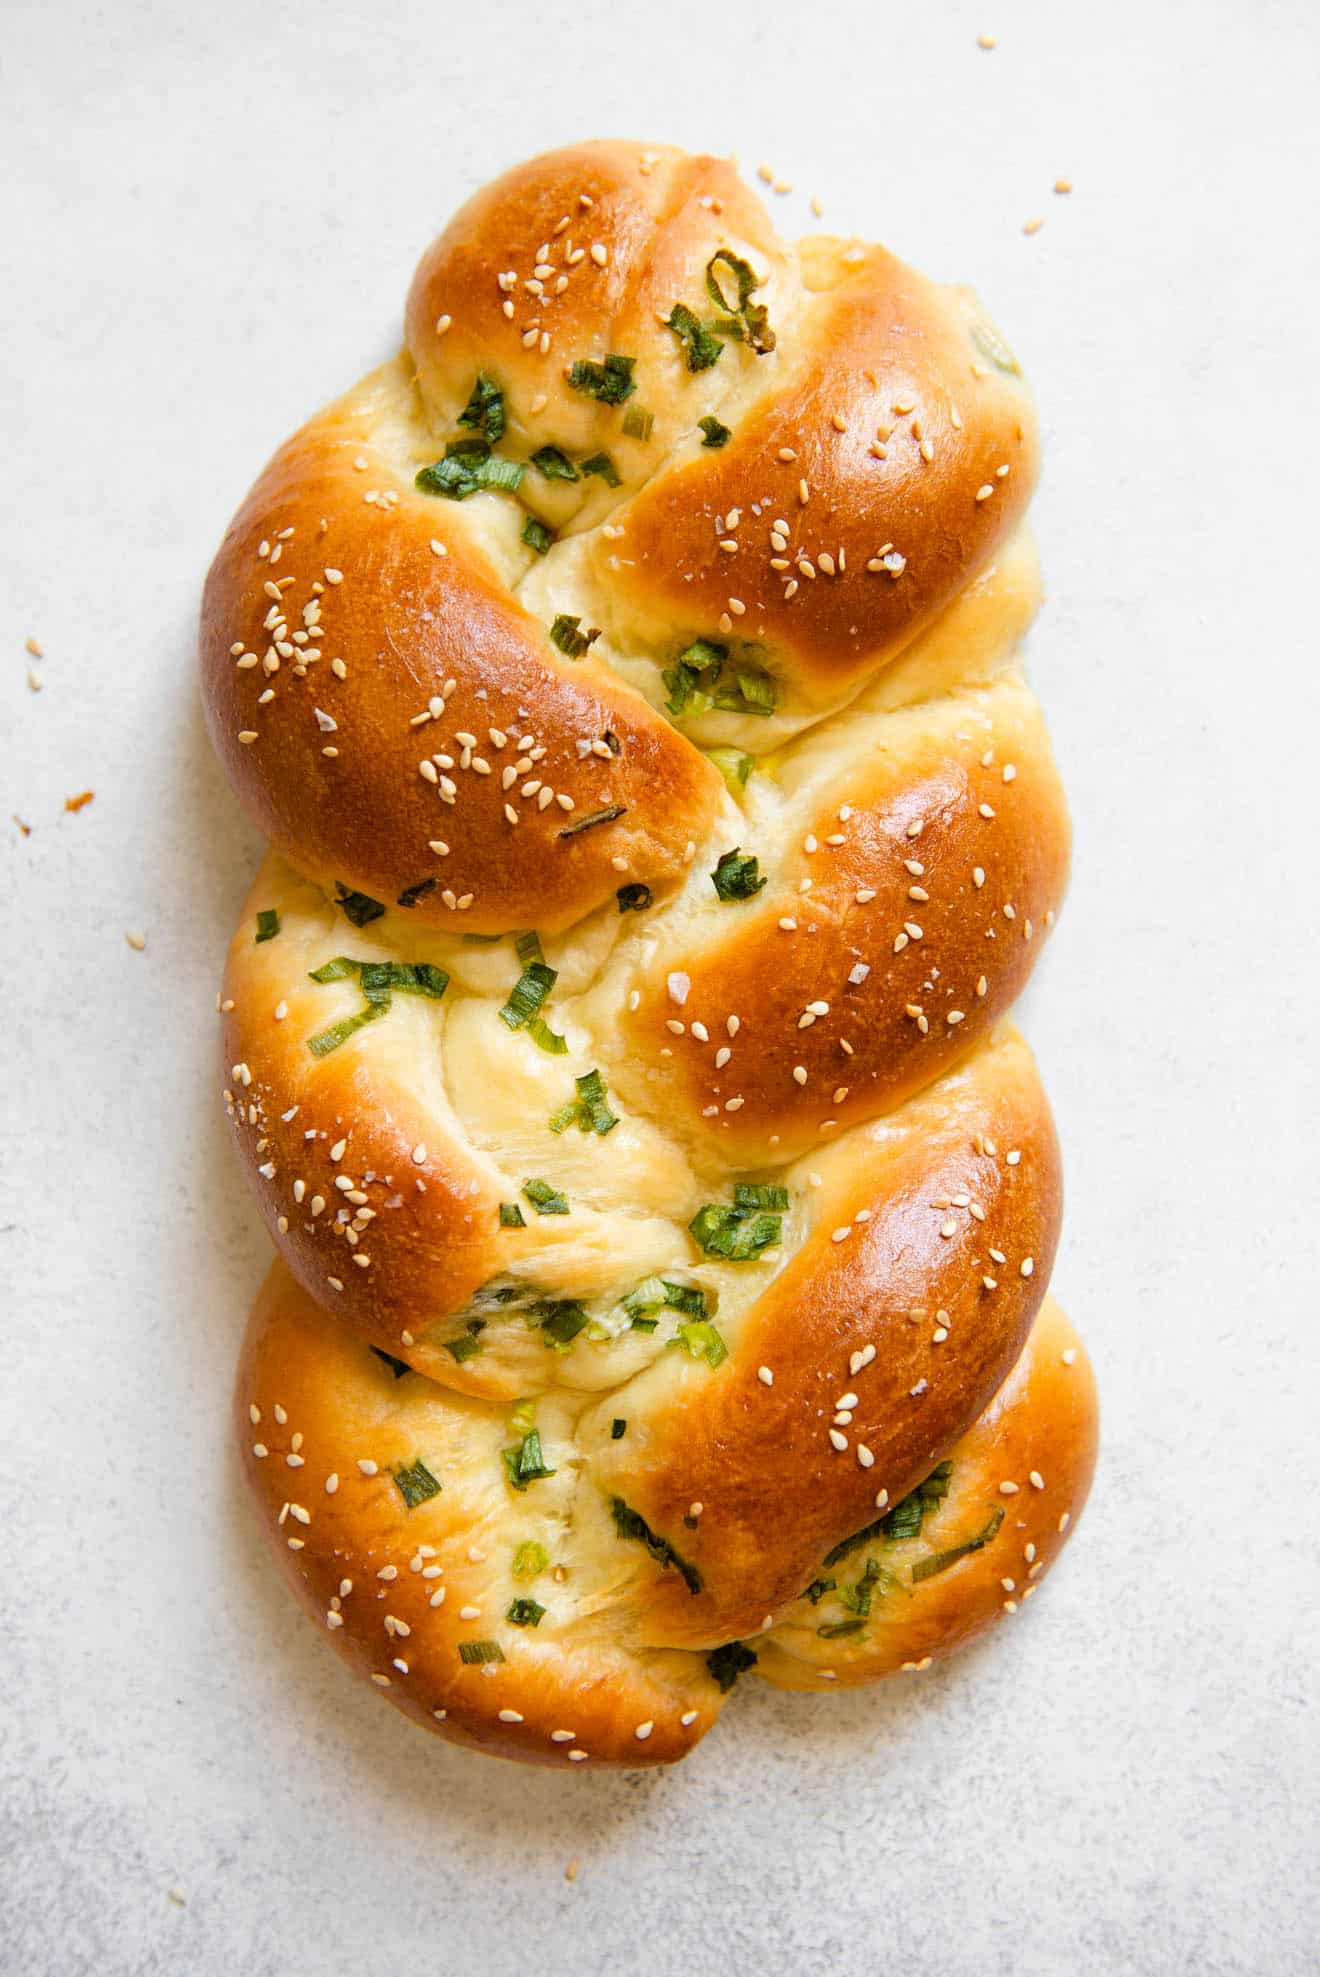
Bake the bread for 22 to 24 minutes, until the tops are golden brown. Take the bread out of the oven. Let the loaves cool on the baking sheet for several minutes before transferring them to a cooling rack.
CAN I PREPARE THE DOUGH AHEAD?
Yes, you can prepare the dough ahead. Transfer the dough to a greased bowl, cover it with plastic or a silicone lid, and let the dough rise overnight in the refrigerator. The dough will be stiff when you first knead it because of the cold temperatures of the refrigerator. If you are having trouble rolling out the smaller pieces of dough to a rectangle, let the dough rest for 15 minutes before rolling them again. The tricky thing about working with chilled dough is proofing the loaves. Because the dough is colder, it’ll take more time for the loaves to double in size. You can speed up the process by preheating your oven to 150ºF. Turn the oven off immediately. Transfer the baking sheet with the loaves into the oven, uncovered. Let the loaves proof for about 20 minutes and check to see if they have doubled in size. Don’t leave the loaves in the oven for more than 30 minutes. The danger about proofing your loaves with this method is that it is very easy to overproof the loaves. You’ll know that you overproofed when you see that the loaves have melted into a pool of doughy misery. This happened to me during one of my test batches, so I have become much more diligent about checking the process of the proofing every 10 minutes. The loaves will be delicate to touch with this sped up proofing method. They’ll feel like they can easily deflate under the slightest of pressure. Therefore, be very careful when you brush the egg wash over the dough. Because there are so many ways that things can go wrong, I recommend this sped up proofing method only if you have made the scallion bread successfully before without the sped up proofing. That way, you’ll have a frame of reference for how the loaves should look like after the second rise.
CAN I MAKE SMALLER LOAVES?
Yes, you can use this recipe to make 4 smaller loaves. That is something I tried when testing the recipe. However, shaping 4 loaves can take almost an hour. As a result, your first loaf can have almost 45 extra minutes of proofing time compared to the last loaf. Of course, you can place the lined baking sheet into the refrigerator and transfer the braided loaves to the fridge as you work. The cold temperature of the fridge will slow down the proofing process. To me, that is adding unnecessary steps to an already complicated recipe. For the sake of simplicity, I recommend shaping 2 loaves for this recipe.
DOES THE BREAD FREEZE WELL?
Yes! To reheat the scallion bread, place the frozen loaf (or loaves) on a baking sheet. Then, bake it at 350ºF for about 13 to 15 minutes, until the center is nice and warm.
CAN I BRUSH THE LOAVES WITH DOUBLE EGG WASH?
If you have made other braided breads (like challah), you may be familiar with the double egg wash technique: brushing a thin layer of egg wash over the loaf before and after the proofing process. The double egg wash generally yields loaves with a shinier and more golden top. Because of the scallions inside the loaves, I don’t recommend the double egg wash technique. It adds considerable moisture to the loaves, making them soggy and more likely to tear apart.
MORE RECIPES WITH BOB’S RED MILL FLOURS
Milk BreadPineapple BunsVegetarian Gua BaoHomemade Noodles with Spicy Peanut Sauce
Disclosure: This post was sponsored by Bob’s Red Mill! To learn more about their products and to get more recipe inspiration, follow them on Instagram or Facebook.